Doilies and Diecuts Class HERE!!!!

Join Us For Another Online Crop: Feb 26-28
User avatar
Laura Fiore
Wild Cherry
Posts: 16731
Gallery: 1270

Re: Doilies and Diecuts Class HERE!!!!

Post by Laura Fiore »

We will use the Basic Grey Papers on several layouts, so you want to cut them first. Before you cut, make sure and take a look again at the photos above of completed layouts so that you can see where they will be used. All measurements will read width x length.
Cut the Doily as followsImage


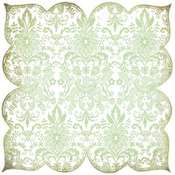
Cut this once, horizontally 8 inches from the top, so that you have two pieces. They will be 12 x 8 and 12 x 4.
User avatar
Laura Fiore
Wild Cherry
Posts: 16731
Gallery: 1270

Re: Doilies and Diecuts Class HERE!!!!

Post by Laura Fiore »

Cut Basic Grey Refresh Paper as follows:
Image


12 x 1-1/2" Strip
12 x 3/4" Strip
You will use the balance of this sheet for matting photos and adding to other layouts so set it aside.
User avatar
ajkulig
Cherry Bing
Posts: 2208
Gallery: 47

Re: Doilies and Diecuts Class HERE!!!!

Post by ajkulig »

I will be picking this up later. The babies decided they need me attention to much to actually get things done.
Find my books here. See the mom (crafting, cooking, organizing, and homeschooling) side of me here. {Under construction}
User avatar
Laura Fiore
Wild Cherry
Posts: 16731
Gallery: 1270

Re: Doilies and Diecuts Class HERE!!!!

Post by Laura Fiore »

Cut Basic Grey Aloe as follows:
Image


12 x 4" Strip (dark side used)
12 x 1-3/4" Strip (light side used)
10-3/4" x 6-3/4" (dark side used)

I will give sizes for the assortment of patterned paper scraps used as the layouts are described below.
User avatar
Laura Fiore
Wild Cherry
Posts: 16731
Gallery: 1270

Re: Doilies and Diecuts Class HERE!!!!

Post by Laura Fiore »

ajkulig wrote:I will be picking this up later. The babies decided they need me attention to much to actually get things done.


No problem Angela...I think it will be easier to do the projects after you see all of the directions anyway!
User avatar
Laura Fiore
Wild Cherry
Posts: 16731
Gallery: 1270

Re: Doilies and Diecuts Class HERE!!!!

Post by Laura Fiore »

Image

1- Place 12 x 8 Diecut at top of Kraft Background Paper
2- Punch Border or use deco scissors on 1-1/2" strip of Yellow side of Refresh. I placed this at the bottom of my diecut, so that it just peeked out above the green of the bottom strip
3- Place 12 x 4 Green side of Aloe at bottom of layout
4- I'm making a heritage page, so I wanted a little more distressing...I added a bit of Bronze Glimmer Mist to the entire page.
Image
User avatar
scrap-4-life
Cherry Bing
Posts: 2415
Gallery: 138

Re: Doilies and Diecuts Class HERE!!!!

Post by scrap-4-life »

So very cool Laura!
~Julie

http://www.joverby.blogspot.com/
Spellbinders DT

User avatar
PezKat
Chocolate Covered Cherry
Posts: 8241
Gallery: 514

Re: Doilies and Diecuts Class HERE!!!!

Post by PezKat »

I'm here, finally! I really need to get some stuff done though so may not get to read through all of it until later. I have my doilie & die cuts & ink (oh my!) sitting out ready though! :)
Image Image
User avatar
scrappininAK
Cherry Jubilee
Posts: 14438
Gallery: 1886

Re: Doilies and Diecuts Class HERE!!!!

Post by scrappininAK »

I'm checking in - don't have any lacy papers but I sprayed over some chipboard snowflakes for mine
Heather

My Blog Unleashed
My Etsy Store CutMania
CutMania Newsletter Sign Up
User avatar
Laura Fiore
Wild Cherry
Posts: 16731
Gallery: 1270

Re: Doilies and Diecuts Class HERE!!!!

Post by Laura Fiore »

Image


5- Mat photo on Graph Side of Refresh paper, trim 1/8" outside of photo, distress and ink edge.
6- Add ribbon, lace, or more punched borders at bottom of page (photo will be placed over a portion of this)
7- Add journaling spot or tags (I used Jenni Bowlin products for this). Here's a closeup for details of the last two steps:
Image
User avatar
Renee
Chocolate Covered Cherry
Posts: 8833
Gallery: 353

Re: Doilies and Diecuts Class HERE!!!!

Post by Renee »

Laura, those layouts are fabulous!! What a great technique!
Image
User avatar
Laura Fiore
Wild Cherry
Posts: 16731
Gallery: 1270

Re: Doilies and Diecuts Class HERE!!!!

Post by Laura Fiore »

Renee wrote:Laura, those layouts are fabulous!! What a great technique!

Thank you Renee!
User avatar
Laura Fiore
Wild Cherry
Posts: 16731
Gallery: 1270

Re: Doilies and Diecuts Class HERE!!!!

Post by Laura Fiore »

8- Cut three large flowers from your glitter diecut sheet...I used the brightest, biggest I could cut cleanly. Attach to layout using a triangular design...this adds interest and draws the eye into the page.
Image

9- Add buttons to the flowers for embellishment. I layered some large buttons with the Jenni Bowlin buttons for added interest. I also love the look of a button tied with twine, so that's what I did here.
10- Place photo over border between and title spot with dimensional adhesive so that it pops off the page
11- Use Kraft Paper strips to handwrite your journaling
User avatar
Laura Fiore
Wild Cherry
Posts: 16731
Gallery: 1270

Re: Doilies and Diecuts Class HERE!!!!

Post by Laura Fiore »

Layout 2-Cute Couple 4 Sure
Image


We'll be using the Glimmer Misted background on this, or you can use any solid cardstock. I love the design of the doily masked onto the cardstock with a bit of the Lemon Meringue mist covered with Gold mist.
1- Place balance of Basic Grey Doily over dark cardstock. I used black because I wanted a little more elegance on this layout. Cut around outside edge of Doily, leaving just the dark behind the cutouts in the doily.
2- Cut Kraft Paper 8"x10-3/4" Distress and ink edges
3- Distress and ink edge of previously cut 10-3/4" x 6-3/4" Green side of Basic Grey Aloe
4- Distress and ink edges of previously cut Basic Grey strips...the 3/4" x 12" yellow side of the Refresh, and the 1-3/4" x 12" strip of the light side of the Aloe
5- Mat photo on Graph side of Refresh, distress and ink edges, then wrap with ribbon, embroidery floss or twine
6- Now assemble...the layers are as follows: Misted cardstock, kraft, green aloe, dark backed doily, light strip of aloe, yellow strip, photo
7- Stamp a journaling spot, or use one from your stash and determine where you want to put it. Mine is small, so I layered it over the lower corner, but if you have more you'd like to say, you could use a larger block and line it up down that green strip next to the photo.
8- Using Making Memories green flutter frame, place over the graph side of the BG Refresh, cut out around edge. I added the title first and the popped it up with dimensional adhesive.
User avatar
scrap-4-life
Cherry Bing
Posts: 2415
Gallery: 138

Re: Doilies and Diecuts Class HERE!!!!

Post by scrap-4-life »

**gasp** Amazing job!!
~Julie

http://www.joverby.blogspot.com/
Spellbinders DT

User avatar
jmo95
Cherry Cola
Posts: 6676
Gallery: 964

Re: Doilies and Diecuts Class HERE!!!!

Post by jmo95 »

i wasn't able to get supplies before the class...but loving your ideas....as usual!
Jenn
Don't fear the challenge, challenge the fear.


Image Image
User avatar
Laura Fiore
Wild Cherry
Posts: 16731
Gallery: 1270

Re: Doilies and Diecuts Class HERE!!!!

Post by Laura Fiore »

Layout 3 - Where do You Go From Here?
Image


For this layout, I used one of the Martha Stewart Diecuts...this one is a creamy yellow...I wanted to bump up the color a little, so I lightly misted it with the Lemon Meringue Glimmer Mist. I also layered it over a misted sheet of Kraft cardstock...I used the Lily Pad Glimmer mist heavy along the bottom and then lighter up at the top where the flowers would show through. I added a bit of the Lemon Meringue at the top of the page to give some variation to the background colors.
This is where you will need to use some scraps, or if you happened to purchase some of the Making Memories Flutter line, you can follow along exactly.
1- Place Misted Diecut over misted cardstock to create background for your page. When placing a diecut like this on a background, I use glue dots on the largest parts I can find of the diecut. I just used my glue runner along the outside edges, and then added a few dots along the bottom for stability.
2- Using paper scraps, create a strip 12" x 3-1/4" The strip can be all one piece of patterned paper, or you can use several to create the look of this Making Memories paper
Image
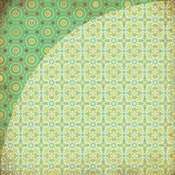
I cut mine down to get the colors I wanted to use, and then punched a border along the bottom. Place over diecut sheet, spanning from edge to edge...I wanted just the flowers below this on my page, so I looked for that edge when placing it down
3- I used my last piece of that Basic Grey Refresh Graph side to make a title/journaling spot for this page. I also used one of the Flutter Journaling pages for my Photo mat. Depending on what size or how many photos you have, you can play with these layers for your favorite look on the page
4- Add the title and journaling to your page
5- Add embellishments...buttons, small flowers, bling to your page. I had some of those fun diecuts left over from my Making Memories Flutter reveal, so I cut one in have to add a date spot to my page edge. Doodle or stitch around the edge to ground the top of the diecut to the page
User avatar
bay63
Cherry Bing
Posts: 2648
Gallery: 12

Re: Doilies and Diecuts Class HERE!!!!

Post by bay63 »

Laura Fiore wrote:
Or use Gold, which I like better...it's a lot lighter and won't overpower the background sheet you're trying to make. I used a little of both to make the background on the second layout above.


When you do this, should you wait till the 1st one dries or while it is still wet?
Image
ImageImage Image
User avatar
Laura Fiore
Wild Cherry
Posts: 16731
Gallery: 1270

Re: Doilies and Diecuts Class HERE!!!!

Post by Laura Fiore »

scrap-4-life wrote:**gasp** Amazing job!!


Thank you Julie!!!


And Hi to you and Jen!

Jen, don't worry about it...you can always get them later if you want, or you can find something you have to use these techniques on!
User avatar
Mom2Bri
Chocolate Covered Cherry
Posts: 8131
Gallery: 248

Re: Doilies and Diecuts Class HERE!!!!

Post by Mom2Bri »

I'm late sorry. I had to work over.
Teresa --"When the power of love is greater than the love of power,
the world will know peace."
http://www.acherryontop.com/i/thumbnail ... linkie.gif
Post Reply

Return to “February Crop 2010”